


Photo by Sebastian Svenson on Unsplash
Integrating a caching strategy is one of the best ways to improve a website’s performance, reduce the number of resources used, and ultimately improve our users’ experience by faster loading times.
The story has been originally published here.
Introduction
There are three main strategies when it comes to integrating a caching solution with your React application, which all depend on your own custom requirements.
Those requirements regard the period of the content we wish to store, the frequency with which the cached content changes, the reliability of the server requests, as well as the type of application we are working with, which might be focused on either online or offline interactions.
Caching in a nutshell
A factor that you might have to take into consideration, though, is whether your current project or the project you intend to start working on is using a state management library such as Redux/Vuex/MobX, as that will require a different approach than what we’ll be going through in this article.
Notes: In this article, we’ll be working with the Browser’s Local Storage API, as it is the most reliable and suitable solution for working with cache. We use the useEffect hook, which you can read more about here.
Caching Strategies
1. Fallback Caching
This one might be the simplest yet effective caching strategy, nonetheless. It allows us to protect ourselves against failing requests by always storing a previous version of the content we’re trying to retrieve.
Although it doesn’t really help much in terms of performance, its real benefit comes in the form of being a good measure for ensuring we’re protecting ourselves from failing server requests that would make us run into unexpected situations otherwise.
const [posts, setPosts] = useState([]);
useEffect(() => {
const fetchData = async () => {
try {
const { data } = await axios.get('jsonplaceholder.typicode.com/posts');
setPosts(data);
localStorage.setItem("posts", data);
} catch (err) {
setPosts(localStorage.getItem("posts") || []);
}
};
fetchData();
}, []);
2. Local-first Caching
This is a caching strategy that is best suited for scenarios where we wish to cache content that is unlikely to change often, such as a list of navigation links, a user’s profile information (profile picture URL, bio, birth date, username, etc.), an archive, etc.
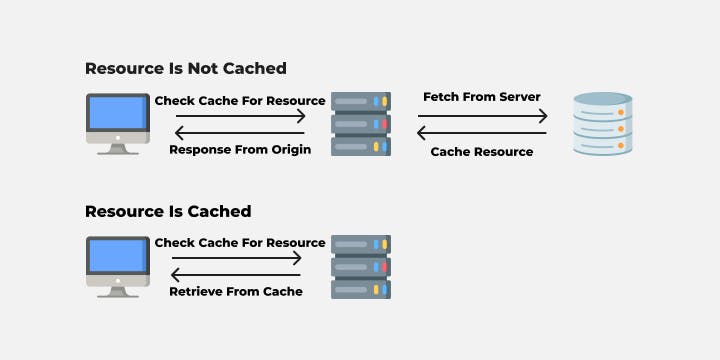
The strategy consists of us checking the cache before sending out a request to fetch data so that we can then skip requesting data on each subsequent request after the first one. It really shines when we are caching content on an often-visited page.
const [posts, setPosts] = useState([]);
useEffect(() => {
const storedPosts = localStorage.getItem("posts");
const fetchData = async () => {
try {
const { data } = await axios.get('jsonplaceholder.typicode.com/posts');
setPosts(data);
localStorage.setItem("posts", data);
} catch (err) {
// Handle Error
}
};
if (!storedPosts) {
fetchData();
}
}, []);
3. Versioned Cache
A more advanced caching technique is the one where we are versioning the cache. It consists of us labeling a version of the content we wish to cache alongside the content itself in a cache storage entry.
The versioning is a controlled process, meaning that we can trigger side effects on a locally computed version to update the cache whenever we need it to, similarly to the way it’s been done in the code snippet below.
const [posts, setPosts] = useState([]);
useEffect(() => {
// Versioned Cache Entry
const versionedPostsEntry = localStorage.getItem('posts');
const versionedPosts = versionedPostsEntry.posts;
const cacheVersion = versionedPostsEntry.version;
// This will be computed according to your use-case
const computedVersion = 2;
const fetchData = async () => {
try {
const { data } = await axios.get('jsonplaceholder.typicode.com/posts');
setPosts(data);
localStorage.setItem("posts", {
version: computedVersion,
posts: data,
});
} catch (err) {
// Handle Error
}
};
if (!cacheVersion || cacheVersion < computedVersion) {
fetchData();
} else {
setPosts(versionedPosts);
}
}, []);
As outlined in the example above, there is a version label attached to each cached entry that will be used to track the current cache version to an externally computed value (This will act as our control switch). That means that the caching process can be controlled smoothly to allow for cache updates whenever needed.
This strategy is the best of both worlds, as we can not only choose to deal with occasionally urgent changes to the cached content, but we can also maintain it for more extended periods of time depending on the scenario at hand, so it’s all up to us.
The downside of this strategy would be the further complexity along the way to keep everything under control, as we’ll have to orchestrate side effects carefully.
Wrapping Up
Several benefits come with integrating caching solutions in your React Applications: from performance gains to UX improvements by removing load times and reducing the use of resources through fewer requests sent to the server and thus resulting in less overall pressure put on the Back-End architecture.
I hope you’ve enjoyed reading this article and have learned something new from doing so.
If you have any suggestions or questions regarding anything I’ve discussed in this article, or you wish to leave feedback, feel free to drop a comment below, and we’ll discuss further.
Cheers!